It is easy to create a poll in ManagementStudio simply by including voting buttons in an email message. Voting buttons is a useful feature, which can help collect the end-users’ decisions with email messages easily. When end-users respond using the voting buttons, an admin can either automatically tabulate the results of the vote in a Datamining Report or export the responses.
Here are a few examples on what you can use the polling/voting feature for:
- Send a poll to your end users asking them to vote for devices they were most interested in using such as a Macbook or PC?
- Laptop, Tablet or Desktop?
- A vote on what mobile device they would prefer – an iPhone, a Samsung or Android mobile device?.
- Which of six choices is the perfect name for that new office building?
- Where should the team hold its next offsite meeting?
- Gather feedback on a recent Migration project.
Polling your end users to gather feedback and information can help you learn more about their needs and demands. It is useful to send an email to a group of people to see what everyone thinks of an idea, or perhaps a preference on what they would like to have. This article explains how to create a poll in ManagementStudio.
Note: This feature is available in version v2023.12.1.x which will be released in March 2023.
USE CASE
Assume you’re a Project Manager that has recently deployed Multi-Factor Authentication and would like to get feedback on the deployment. You can use the polling feature to get this information from your end users. This article will explain how to create the poll to get this information.
Note: If you require further support, please visit ManagementStudio’s Service Desk to search the knowledge base or create a new support ticket
Step 1 – Create Field
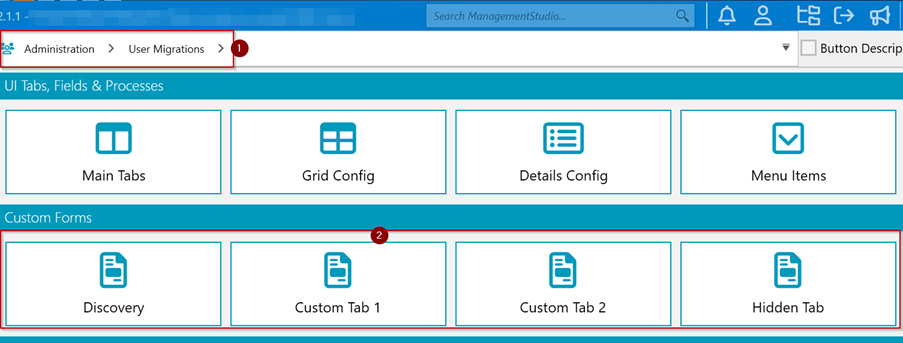
Create a field within the User Migration module to hold the result of the vote. This field should be created within the custom form section. Typically, Administration->User Migrations (#1 in the image below)->Custom Forms(#2).

- Create a field on the User record to hold the result of the vote and take note of its Id
- Switch to Administration -> User Migrations->Discovery (#1 in the image above).
- Click New Tab (#2) and enter a descriptive name.
- Click on the Newly created tab (#3).
- Create the Field (#4) and Click Save Changes (#5).
- Make a note of the FieldId (#6).
STep 2 – Create PowerShell Script
The PowerShell script will accept the Vote value as an input and updates the field in step 1.
- Switch to Administration->User Migrations->PowerShell Scripts.(#1 in the image below).
- Click here to add new item(#2).
- Enter a descriptive name.
- Click the Edit symbol (#3) and enter the PowerShell script. Amend the $fieldId to match the field id created in step 1.
- Amend the datavalue and Header messages accordingly.
- Click Save Changes (#4).
- Make a note of the PowerShell Script Id. In the screenshot, it is 5106.

- Click OK.
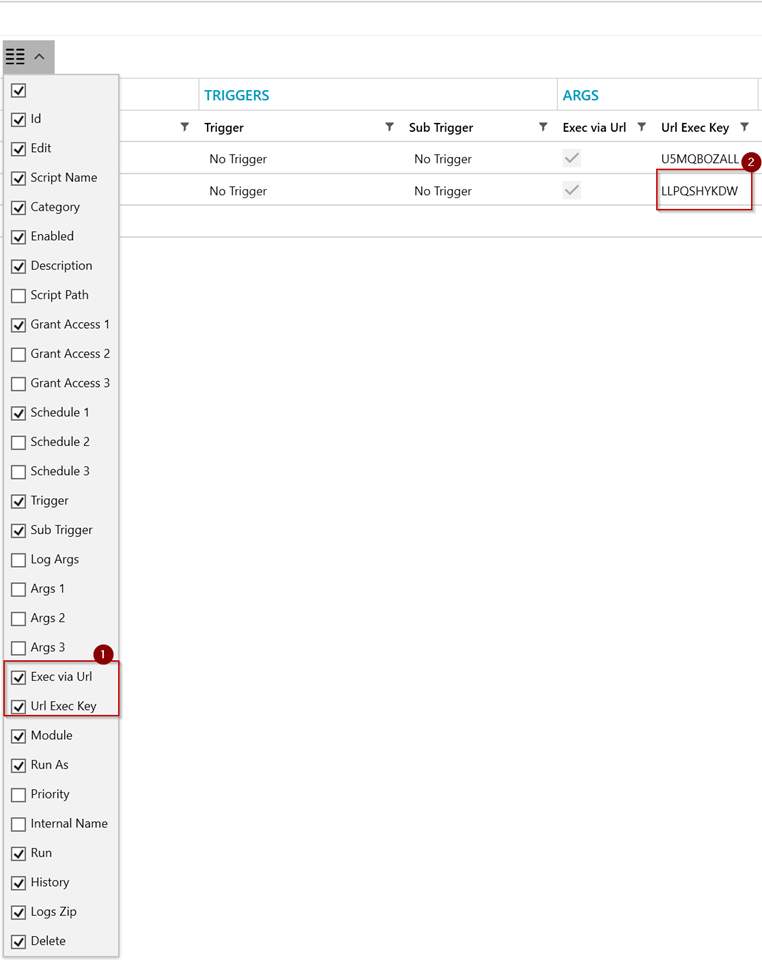
- Using the Column chooser, enable the following columns (#1 in the image below):
- Exec via url
- Url Exec Key
- Make a note of the Url Exec key (#2).
Note: Please refer to this article for more info on the activation Url PowerShell Scripts.
Url Structure
'<a href="https://{ServerUrl}/{ProjectId}/p/a/script/{InstanceId}/{ScriptId}?ikey={Instance_RandomKey}&skey={Script_UrlExecKey}" target="_blank">Unlock Slot</a>'
An example of a URL PowerShell script:
"http://serverName/3/p/a/script/[UM-MigrationId]/5106?ikey=[UM-RandomKey]&skey=LLPQSHYKDW&args1=Yes, all good."Step 3 – Create Email Template
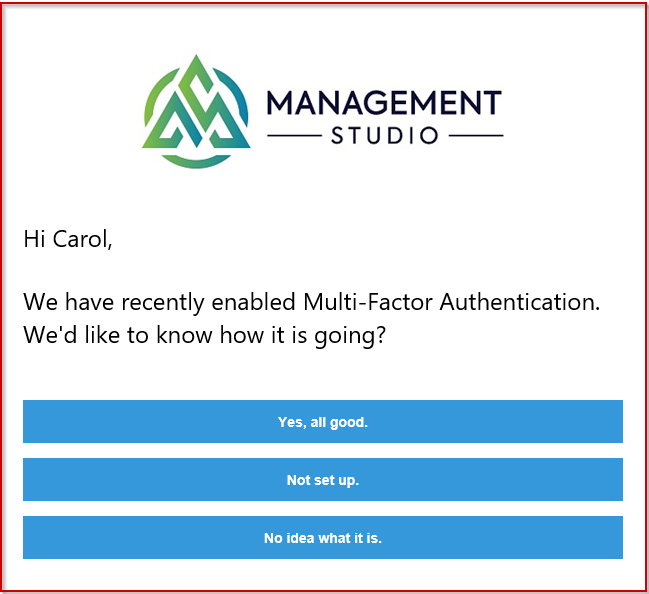
The email template will have buttons that have the votes value and link to the PowerShell Script activation url.
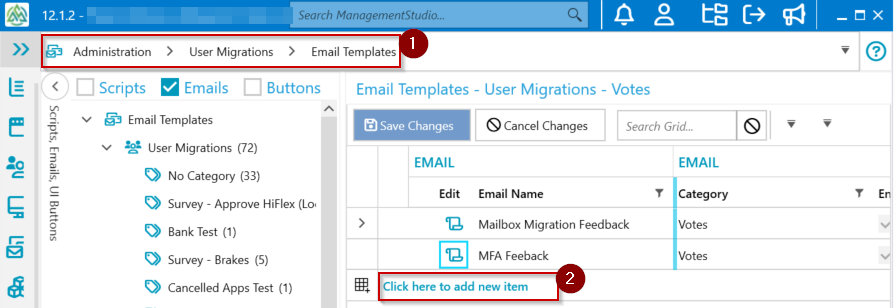
- Switch to Administration->User Migrations->Email Templates (#1).
- Click here to add new item (#2), enter a descriptive name.
- Enter the subject for the email.
- Click the Edit symbol.
- Enter the following content:
## Hi [UM-FirstName],

## We have recently enabled Multi-Factor Authentication. We’d like to know how it is going?

<br/>
<table border=”0″ cellpadding=”0″ cellspacing=”0″ class=”btn btn-primary” style=”border-collapse: separate; mso-table-lspace: 0pt; mso-table-rspace: 0pt; width: 100%; box-sizing: border-box;”>
    <tbody>
    <tr>
        <td align=”left” style=”font-family: sans-serif; font-size: 14px; vertical-align: top; padding-bottom: 15px;”>
            <table border=”0″ cellpadding=”0″ cellspacing=”0″ style=”border-collapse: separate; mso-table-lspace: 0pt; mso-table-rspace: 0pt; width: auto;”>
                <tbody>
                <tr>
                    <td style=”font-family: sans-serif; font-size: 14px; vertical-align: top; background-color: #3498db; border-radius: 5px; text-align: center;”>
                    <a href=”http://ServerName/3/p/a/script/[UM-MigrationId]/5106?ikey=[UM-RandomKey]&skey=LLPQSHYKDW&args1=Yes, all good.” target=”_blank”
                    style=”display: inline-block; color: #ffffff; background-color: #3498db; border: solid 1px #3498db; border-radius: 5px; box-sizing: border-box; cursor: pointer; text-decoration: none; font-size: 14px; font-weight: bold; margin: 0; padding: 12px 25px; text-transform: capitalize; border-color: #3498db;”>
                    Yes, all good.</a> </td>
                </tr>
                </tbody>
            </table>
        </td>
    </tr>
    </tbody>
</table>
<table border=”0″ cellpadding=”0″ cellspacing=”0″ class=”btn btn-primary” style=”border-collapse: separate; mso-table-lspace: 0pt; mso-table-rspace: 0pt; width: 100%; box-sizing: border-box;”>
    <tbody>
    <tr>
        <td align=”left” style=”font-family: sans-serif; font-size: 14px; vertical-align: top; padding-bottom: 15px;”>
            <table border=”0″ cellpadding=”0″ cellspacing=”0″ style=”border-collapse: separate; mso-table-lspace: 0pt; mso-table-rspace: 0pt; width: auto;”>
                <tbody>
                <tr>
                    <td style=”font-family: sans-serif; font-size: 14px; vertical-align: top; background-color: #3498db; border-radius: 5px; text-align: center;”>
                    <a href=”http://ServerName/3/p/a/script/[UM-MigrationId]/5106?ikey=[UM-RandomKey]&skey=LLPQSHYKDW&args1=Not set up.” target=”_blank”
                    style=”display: inline-block; color: #ffffff; background-color: #3498db; border: solid 1px #3498db; border-radius: 5px; box-sizing: border-box; cursor: pointer; text-decoration: none; font-size: 14px; font-weight: bold; margin: 0; padding: 12px 25px; text-transform: capitalize; border-color: #3498db;”>
                    Not set up.</a> </td>
                </tr>
                </tbody>
            </table>
        </td>
    </tr>
    </tbody>
</table>
<table border=”0″ cellpadding=”0″ cellspacing=”0″ class=”btn btn-primary” style=”border-collapse: separate; mso-table-lspace: 0pt; mso-table-rspace: 0pt; width: 100%; box-sizing: border-box;”>
    <tbody>
    <tr>
        <td align=”left” style=”font-family: sans-serif; font-size: 14px; vertical-align: top; padding-bottom: 15px;”>
            <table border=”0″ cellpadding=”0″ cellspacing=”0″ style=”border-collapse: separate; mso-table-lspace: 0pt; mso-table-rspace: 0pt; width: auto;”>
                <tbody>
                <tr>
                    <td style=”font-family: sans-serif; font-size: 14px; vertical-align: top; background-color: #3498db; border-radius: 5px; text-align: center;”>
                    <a href=”http://ServerName/3/p/a/script/[UM-MigrationId]/5106?ikey=[UM-RandomKey]&skey=LLPQSHYKDW&args1=No idea what it is.” target=”_blank”
                    style=”display: inline-block; color: #ffffff; background-color: #3498db; border: solid 1px #3498db; border-radius: 5px; box-sizing: border-box; cursor: pointer; text-decoration: none; font-size: 14px; font-weight: bold; margin: 0; padding: 12px 25px; text-transform: capitalize; border-color: #3498db;”>
                    No idea what it is.</a> </td>
                </tr>
                </tbody>
            </table>
        </td>
    </tr>
    </tbody>
</table>
Step 4 – Tracking Responses
You can track the votes/feedback from your end-users. This can be achieved by running a user’s datamining report.
- Switch to User Migrations module (#1).
- Click on Datamining Report (#2).
- Scroll down to the Custom Fields section and select the question you want to report against (#3).
- Click Run Datamining Report (#4).
- The report will display the results of the votes.
- This can be manipulated and exported into Excel or CSV.
Wrap-Up
There you go! That was all about how to create Poll/voting in Emails. If you have any questions about this article, we would love to hear from you! Leave a message for us by visiting our contact page.

